
React-tableでテーブルを作成することができ、ソート機能、フィルダー機能があるため、魅力的なのですが、癖が強い。初見で理解する事が難しい。ソート機能とフィルタ―機能の備忘録です。
テーブルを作るには?普通にHTMLのテーブルタグを使ってもいいけど、せっかくならフィルタリング、ソートをしたい。
ここではReact Tableではテーブルはどのように作られていて、また、どうやってテーブルのソートや、フィルタリングをするのか、V7の情報は結構出てくるのですが、V8が中々出てこなかった。
React-queryも使いましたが、詳しくはこちらをご確認ください。
React Table V8
React-Table
npm install @tanstack/react-table
まずは、次のようなテーブルを表示させます。

最低限のコードですが...
それでも長いですね...
import React from "react";
import { flexRender, getCoreRowModel, useReactTable, } from '@tanstack/react-table'
function App() {
  const table = useReactTable({
    data: [
      { No: 1, title: "追憶", type: "旧字旧仮名", name: "萩原 朔太郎" },
      { No: 2, title: "追憶", type: "新字新仮名", name: "芥川 竜之介" },
      { No: 3, title: "追憶", type: "旧字旧仮名", name: "素木 しづ" },
      { No: 4, title: "追憶", type: "新字新仮名", name: "宮本 百合子" },
      { No: 5, title: "「追憶」による追憶", type: "新字旧仮名", name: "岸田 国士" },]
    ,
    columns: [
      { accessorKey: 'No', header: 'ID', },
      { accessorKey: 'title', header: '作品名副題', },
      { accessorKey: 'type', header: '文字遣い種別', },
      { accessorKey: 'name', header: '著者名	', },
    ],
    getCoreRowModel: getCoreRowModel(),

  })

  return (
    <div>
      <table>
        <thead>
          {table.getHeaderGroups().map(headerGroup => (
            <tr key={headerGroup.id}>
              {headerGroup.headers.map(header => {
                return (
                  <th key={header.id} colSpan={header.colSpan}>
                    <div>
                      {flexRender(
                        header.column.columnDef.header,
                        header.getContext()
                      )}
                    </div>
                  </th>
                )
              })}
            </tr>
          ))}
        </thead>
        <tbody>
          {table.getRowModel().rows.map((row) => {
            return (
              <tr key={row.id}>
                {row.getVisibleCells().map((cell) => {
                  return (
                    <td key={cell.id}>{flexRender(cell.column.columnDef.cell, cell.getContext())}</td>
                  )
                }
                )}
              </tr>
            )
          })}
        </tbody>
      </table>

    </div>
  );
}
export default App;
表が表示されましたが、コードが長すぎて何をやっているのやら...
React-tableで表を作るために「useReactTable」を使います。
ここに必要な表のデータや、ファンクションを追加することで表が表示されたり、ソートや、フィルターをすることができます。
最低限必要な項目は
const table = useReactTable({
  data: 表のデータ ,
  columns : 表の見出し ,
  getCoreRowModel: getCoreRowModel(),
})
表の見出しはcolumsに値を入れます。
見出しのみを表示させる場合はつぎのコードで完結します。
コードを見るとmapを使用し、順番に処理していますね。
そして、実際に文字を出力しているところが「flexRender」になっています。
flexRenderを使用することで加工されたデータ等、ファンクションを使用することができるようになります。
import React from "react";
import { flexRender, useReactTable, } from '@tanstack/react-table'
function App() {
  const table = useReactTable({
    columns: [
      { accessorKey: 'No', header: 'ID', },
      { accessorKey: 'title', header: '作品名副題', },
      { accessorKey: 'type', header: '文字遣い種別', },
      { accessorKey: 'name', header: '著者名	', },
    ],
  })

  return (
    <div>
      <table>
        <thead>
          {table.getHeaderGroups().map(headerGroup => (
            <tr key={headerGroup.id}>
              {headerGroup.headers.map(header => {
                return (
                  <th key={header.id} colSpan={header.colSpan}>
                    <div>
                      {flexRender(
                        header.column.columnDef.header,
                        header.getContext()
                      )}
                    </div>
                  </th>
                )
              })}
            </tr>
          ))}
        </thead>
      </table>
    </div>
  );
}
export default App;
公式がflexRenderを使用しているので、あまりこのように使わない方が良いかもしれませんが一応できます。
/*
<div>
  {flexRender(
    header.column.columnDef.header,
    header.getContext()
  )}
</div>
*/
//次のようにする事も可能。
<div>
  {header.column.columnDef.header}
</div>
bodyを追加する為にはuseReactTableのdataに値を入れてあげなければなりません。
さらにgetCoreRowModelというものも追加する必要があります。
ここでも同様にmapを使い配列を順番に処理していき、flexRenderで値を出力しています。
import React from "react";
import { flexRender, getCoreRowModel, getSortedRowModel, useReactTable, } from '@tanstack/react-table'
function App() {
  const table = useReactTable({
    data: [
      { No: 1, title: "追憶", type: "旧字旧仮名", name: "萩原 朔太郎" },
      { No: 2, title: "追憶", type: "新字新仮名", name: "芥川 竜之介" },
      { No: 3, title: "追憶", type: "旧字旧仮名", name: "素木 しづ" },
      { No: 4, title: "追憶", type: "新字新仮名", name: "宮本 百合子" },
      { No: 5, title: "「追憶」による追憶", type: "新字旧仮名", name: "岸田 国士" },]
    ,
    columns: [
      { accessorKey: 'No', header: 'ID', },
      { accessorKey: 'title', header: '作品名副題', },
      { accessorKey: 'type', header: '文字遣い種別', },
      { accessorKey: 'name', header: '著者名	', },
    ],
    getCoreRowModel: getCoreRowModel(),
  })

  return (
    <div>
      <table>
        <tbody>
          {table.getRowModel().rows.map((row) => {
            return (
              <tr key={row.id}>
                {row.getVisibleCells().map((cell) => {
                  return (
                    <td key={cell.id}>{flexRender(cell.column.columnDef.cell, cell.getContext())}</td>
                  )
                }
                )}
              </tr>
            )
          })}
        </tbody>
      </table>
    </div>
  );
}
export default App;
表はただ表示すればいいのであれば、良いのだが、表の中要素に対して、ファンクションや、別の値を入れたい場合があると思います。
表を出力する部分はmap、returnをしているだけなので、その中にクラスや、タグ(divタグ等)を使っても良いですが、React-tableはちゃんとそのような方法も用意されています。手を加えて試しに、著者名に「様」を付けてみます。
//columnsを修正する。
columns: [
  { accessorKey: 'No', header: 'ID', },
  { accessorKey: 'title', header: '作品名副題', },
  { accessorKey: 'type', header: '文字遣い種別', },
  {
    accessorKey: 'name', header: '著者名',cell:
    props => {
        const name = props.cell.getValue();
        return name + "様";
        }
  },
],
表の名前に様が付きました。

    columns: [
      { accessorKey: 'No', header: 'ID', },
      { accessorKey: 'title', header: '作品名副題', },
      { accessorKey: 'type', header: '文字遣い種別', },
      {
        accessorKey: 'name', header: '著者名',cell:
        props => {
            const name = props.cell.getValue();
            return <span style={{backgroundColor:"#8bd"}}> {name} 様 </span>;
            }
      },
    ],

テーブルのソートをする。
ソートをするためには、React-tableに「getSortedRowModel: getSortedRowModel()」を追加し、setSortingファンクションを実行します。
公式のソートで詳しく書かれていますが、複雑な使い方をしないのであれば、「id」と「desc」の二つの情報をReact-tableに渡す必要があるとだけ覚えておいても大丈夫です。
先ほどまで、テーブルデータを変数としていましたが、無限ループが入ってしまうので、useStateを使用してください。
//tabledataのstateを使います。
// getSortedRowModel: getSortedRowModel(),を追加します。
// table.setSorting([{ id: 'name', desc: false }])でソートを実行します。
import { flexRender, getCoreRowModel, getSortedRowModel, SortingState, useReactTable, getFilteredRowModel, ColumnFilter, } from '@tanstack/react-table'
function App() {
  const [tabledata] = React.useState([
    { No: 1, title: "追憶", type: "旧字旧仮名", name: "萩原 朔太郎" },
    { No: 2, title: "追憶", type: "新字新仮名", name: "芥川 竜之介" },
    { No: 3, title: "追憶", type: "旧字旧仮名", name: "素木 しづ" },
    { No: 4, title: "追憶", type: "新字新仮名", name: "宮本 百合子" },
    { No: 5, title: "「追憶」による追憶", type: "新字旧仮名", name: "岸田 国士" },]);

      const table = useReactTable({
    data: tabledata
    ,
    columns: [
      { accessorKey: 'No', header: 'ID', },
      { accessorKey: 'title', header: '作品名副題', },
      { accessorKey: 'type', header: '文字遣い種別', },
      {
        accessorKey: 'name', header: '著者名', cell:
          props => {
            const name = props.cell.getValue();
            return <span style={{ backgroundColor: "#8bd" }}> {name} 様 </span>;
          }
      },
    ],
    getCoreRowModel: getCoreRowModel(),
    getSortedRowModel: getSortedRowModel(),
  })

    const Bfunction = (() => {
    table.setSorting([{ id: 'name', desc: false }])
  })

  return (
    <div>
      <button onClick={Bfunction}>Sort</button>
      <table>
   {/*省略....*/}
  )
  }
ボタンをクリックすると次のように並び替えが行われます。
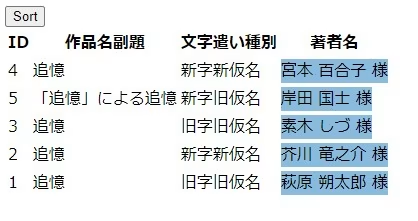
そして、見出しの部分に「onClick」を追加すると見出しのクリックで、ソートをする事もできます。
/*元
<div>
  {flexRender(
    header.column.columnDef.header,
    header.getContext()
  )}
</div>
*/
//新しくonClickを追加する
<div  {...{onClick: header.column.getToggleSortingHandler(),}}>
  {flexRender(
    header.column.columnDef.header,
    header.getContext()
  )}
</div>
フィルターするためには「getFilteredRowModel: getFilteredRowModel()」を追加し、setFilterValueを実行させます。
import { flexRender, getCoreRowModel, getSortedRowModel, SortingState, useReactTable, getFilteredRowModel, ColumnFilter, } from '@tanstack/react-table'
  const table = useReactTable({
    data: tabledata,
    columns: [
      { accessorKey: 'No', header: 'ID', },
      { accessorKey: 'title', header: '作品名副題', },
      { accessorKey: 'type', header: '文字遣い種別', },
      {
        accessorKey: 'name', header: '著者名', cell:
          props => {
            const name = props.cell.getValue();
            return <span style={{ backgroundColor: "#8bd" }}> {name} 様 </span>;
          }
      },
    ],
    getCoreRowModel: getCoreRowModel(),
    getSortedRowModel: getSortedRowModel(),
    getFilteredRowModel: getFilteredRowModel(),//<--これ
  })
  const Bfunction = (() => {
    /*
    getHeaderGroups()[0]
    heders[0] = No ,
    heders[1] = title ,
    heders[2] = type ,
    heders[3] = name ,
    原の文字でフィルタリングしています。
    */
    table.getHeaderGroups()[0].headers[3].column.setFilterValue("原");
  })
  return (
    <div>
      <button onClick={Bfunction}>フィルタ―"原"</button>
      {//省略....
      }
  )

//Buttonクリックでフィルタリングされます。
import React, { useEffect } from "react";
import { flexRender, getCoreRowModel, getSortedRowModel, SortingState, useReactTable, getFilteredRowModel, ColumnFilter, } from '@tanstack/react-table'


function App() {


  const [tabledata] = React.useState([
    { No: 1, title: "追憶", type: "旧字旧仮名", name: "萩原 朔太郎" },
    { No: 2, title: "追憶", type: "新字新仮名", name: "芥川 竜之介" },
    { No: 3, title: "追憶", type: "旧字旧仮名", name: "素木 しづ" },
    { No: 4, title: "追憶", type: "新字新仮名", name: "宮本 百合子" },
    { No: 5, title: "「追憶」による追憶", type: "新字旧仮名", name: "岸田 国士" },]);

  const table = useReactTable({
    data: tabledata,
    columns: [
      { accessorKey: 'No', header: 'ID', },
      { accessorKey: 'title', header: '作品名副題', },
      { accessorKey: 'type', header: '文字遣い種別', },
      {
        accessorKey: 'name', header: '著者名', cell:
          props => {
            const name = props.cell.getValue();
            return <span style={{ backgroundColor: "#8bd" }}> {name} 様 </span>;
          }
      },
    ],
    getCoreRowModel: getCoreRowModel(),
    getSortedRowModel: getSortedRowModel(),
    getFilteredRowModel: getFilteredRowModel(),
  })
  const Bfunction = (() => {
    table.getHeaderGroups()[0].headers[3].column.setFilterValue("原");
  })
  return (
    <div>
      <button onClick={Bfunction}>フィルタ―"原"</button>
      <table>
        <thead>
          {table.getHeaderGroups().map(headerGroup => (
            <tr key={headerGroup.id}>
              {headerGroup.headers.map(header => {
                return (
                  <th key={header.id} colSpan={header.colSpan}>
                    <div  {...{
                      onClick: header.column.getToggleSortingHandler(),
                      }}>
                      {flexRender(
                        header.column.columnDef.header,
                        header.getContext()
                      )}
                    </div>
                  </th>
                )
              })}
            </tr>
          ))}
        </thead>
        <tbody>
          {table.getRowModel().rows.map((row) => {
            return (
              <tr key={row.id}>
                {row.getVisibleCells().map((cell) => {
                  return (
                    <td key={cell.id}>{flexRender(cell.column.columnDef.cell, cell.getContext())}</td>
                  )
                }
                )}
              </tr>
            )
          })}
        </tbody>
      </table>

    </div>
  );
}
export default App;
公式とは乖離のある書き方になっているので、詳しくは公式のReact-tableのサンプルで機能毎にサンプルがありますので、そちらをご参考ください。
フィルタリングやソート機能以外にも統計(grouping)、ページネーション(pagination)もあります。
React-Tableが高機能なのですが...それ故に設定項目が多く、慣れるまで大変ですが、汎用性が高いと思うので覚えておいて損はないと思うが、簡単なものであれば、手書きでコードを書いて行く方が早い気もする。


