
Janus-Getwayを使うためraspbery pi 3にインストールした備忘録です。
Ubuntuにjanusを入れ起動させる。
websocketも使えるようにする。
rtp映像配信ができるようにする。
janusを使うために必要なパッケージをインストールします。

nginxをインストールしておきます。
sudo apt install nginx
janusに必要なパッケージをインストールしていきます。 公式書いてある通りなのでそのまま実行しインストールします。
apt install libmicrohttpd-dev libjansson-dev \
	libssl-dev libsofia-sip-ua-dev libglib2.0-dev \
	libopus-dev libogg-dev libcurl4-openssl-dev liblua5.3-dev \
	libconfig-dev pkg-config libtool automake
libniceも必要なのですが、ubuntuの場合は手動インストールとあるため、手動でlibniceをインストールします。
libniceのインストールのためにまず、meson ninjaとcmakeをインストールします。
apt install cmake
sudo apt install meson ninja-build
ninjaが使える状態になったので、libniceをインストールします。
git clone https://gitlab.freedesktop.org/libnice/libnice
cd libnice
meson --prefix=/usr build && ninja -C build && sudo ninja -C build install
公式ではgitからダウンロードビルドをしているが、その後のbuildが上手くいかなかったため、試しにapt でインストールしたらすんなりできた。
apt install libwebsockets-dev
libsrtは最新のものを使える場合もあるようですが、素直に2.2.0にしました。
wget https://github.com/cisco/libsrtp/archive/v2.2.0.tar.gz
tar xfv v2.2.0.tar.gz
cd libsrtp-2.2.0
./configure --prefix=/usr --enable-openssl
make shared_library && sudo make install
下準備が整ったため、janus-getwayインストールします。
git clone https://github.com/meetecho/janus-gateway.git
cd janus-gateway
websocket有効にしてインストール。不要なものがあればこのconfigureで指定できます。 今回はwebsocketsを有効にするだけです。
./autogen.sh
./configure --prefix=/opt/janus --enable-websockets
make
sudo make install
makeする前に必要なものや不要なものがあれば引数を加えてあげます。
--disable-websockets --disable-data-channels --disable-rabbitmq --disable-mqtt --enable-docs
ラズパイのスペックが低いのか結構時間がかかった。体感20分ぐらい?
インストールが完了したら、janusの設定ファイルを初期化します。
sudo make configs
実行するとjanusの設定ファイルが全てリセットされます。
初期化すると次のフォルダにjcfgファイルがたくさん生成されます。
janusの設定はここを修正してください。
/opt/janus/etc/janus
janusのビルドが正常に終わるとhtmlフォルダがあるのでそれをnginxで表示できるフォルダに移動させます。 nginxのデフォルトは「/var/www/thml」となっています。
sudo cp -a html/* /var/www/thml
nginxを使ってjanusのHTMLを表示できるようにします。
SSLでないとカメラデバイスを取得できないため、自己証明書を適用しSSL化します。
自己証明書の作成方法からcrtとkeyを作成しnginxに設定します。
server {
        listen 80 default_server;
        listen [::]:80 default_server;

        # SSL configuration
        #
         listen 443 ssl default_server;# <----------これ
         listen [::]:443 ssl default_server; <----------これ
         ssl_certificate /etc/nginx/ssl/server.crt; <----------これ
         ssl_certificate_key /etc/nginx/ssl/server.key; <----------これ
        # Note: You should disable gzip for SSL traffic.
        # See: https://bugs.debian.org/773332
        #
        # Read up on ssl_ciphers to ensure a secure configuration.
        # See: https://bugs.debian.org/765782
        #
        # Self signed certs generated by the ssl-cert package
        # Don't use them in a production server!
        #
        #省略
同様にjaunsもhttpsが使えるようにします。
general: {
        #events = true                                  # Whether to notify event handlers about transport events (default=true)
        json = "indented"                               # Whether the JSON messages should be indented (default),
                                                                        # plain (no indentation) or compact (no indentation and no spaces)
        base_path = "/janus"                    # Base path to bind to in the web server (plain HTTP only)
        http = true                                             # Whether to enable the plain HTTP interface
        port = 8088                                             # Web server HTTP port
        #interface = "eth0"                             # Whether we should bind this server to a specific interface only
        #ip = "192.168.0.1"                             # Whether we should bind this server to a specific IP address (v4 or v6) only
        https = true                            # Whether to enable HTTPS (default=false)   <-------これ
        secure_port = 8089                              # Web server HTTPS port, if enabled  <-------これ

        certificates: {

        cert_pem = "/etc/nginx/ssl/server.crt"      #<-------これ
        cert_key =  "/etc/nginx/ssl/server.key"     #<-------これ
        #cert_pwd = "secretpassphrase"
        #ciphers = "PFS:-VERS-TLS1.0:-VERS-TLS1.1:-3DES-CBC:-ARCFOUR-128"
websocketもwsからwssに変更します。
general: {
        #events = true                                  # Whether to notify event handlers about transport events (default=true)
        json = "indented"                               # Whether the JSON messages should be indented (default),
                                                                        # plain (no indentation) or compact (no indentation and no spaces)
        #pingpong_trigger = 30                  # After how many seconds of idle, a PING should be sent
        #pingpong_timeout = 10                  # After how many seconds of not getting a PONG, a timeout should be detected

        ws = true                               # Whether to enable the WebSockets API
        ws_port = 8188                          # WebSockets server port1
        #ws_interface = "eth0"                  # Whether we should bind this server to a specific interface only
        #ws_ip = "192.168.0.1"                  # Whether we should bind this server to a specific IP address only
        #ws_unix = "/run/ws.sock"               # Use WebSocket server over UNIX socket instead of TCP
        wss = true                              # Whether to enable secure WebSockets            <-------これ
        wss_port = 8989                         # WebSockets server secure port, if enabled         <-------これ

certificates: {
        cert_pem = "/etc/nginx/ssl/server.crt"              #<-------これ
        cert_key =  "/etc/nginx/ssl/server.key"             #<-------これ
        #cert_pem = "/path/to/cert.pem"
        #cert_key = "/path/to/key.pem"
        #cert_pwd = "secretpassphrase"
        #ciphers = "ECDHE-RSA-AES256-GCM-SHA384:ECDHE-RSA-AES128-GCM-SHA256"
}
ngixnとjanusを起動します。
sudo systemctl restart nginx
sudo /opt/janus/bin/janus
janus起動の際WARNが出てくるが気にせず起動させます。

janusで正常にHTTPSで起動出来た場合は次のような文字が表示されます。
HTTP webserver started (port 8088, /janus path listener)...
HTTPS webserver started (port 8089, /janus path listener)...
websocketが正常に動作している場合は次のように表示されます。
Websockets server started (port 8188)...
Secure Websockets server started (port 8989)...
ブラウザーでjanusでもページを読みんでみます。
https://[ipaddress]/にアクセスします。


配信はffmpegで配信してみます。
ffmpeg -f lavfi -re -i "testsrc=size=1280x720:rate=30" -c:v libvpx -f rtp "rtp://192.168.1.105:5004

ソースはopus/VP8 live stream coming form external sourceを選んでください。


Chromeのdevtoolsでwssの接続を確認します。
エラーが出るので、janus「ローカルip」のページを開いて、そこでDevToolsを起動してください。
websocket接続を試してみます。
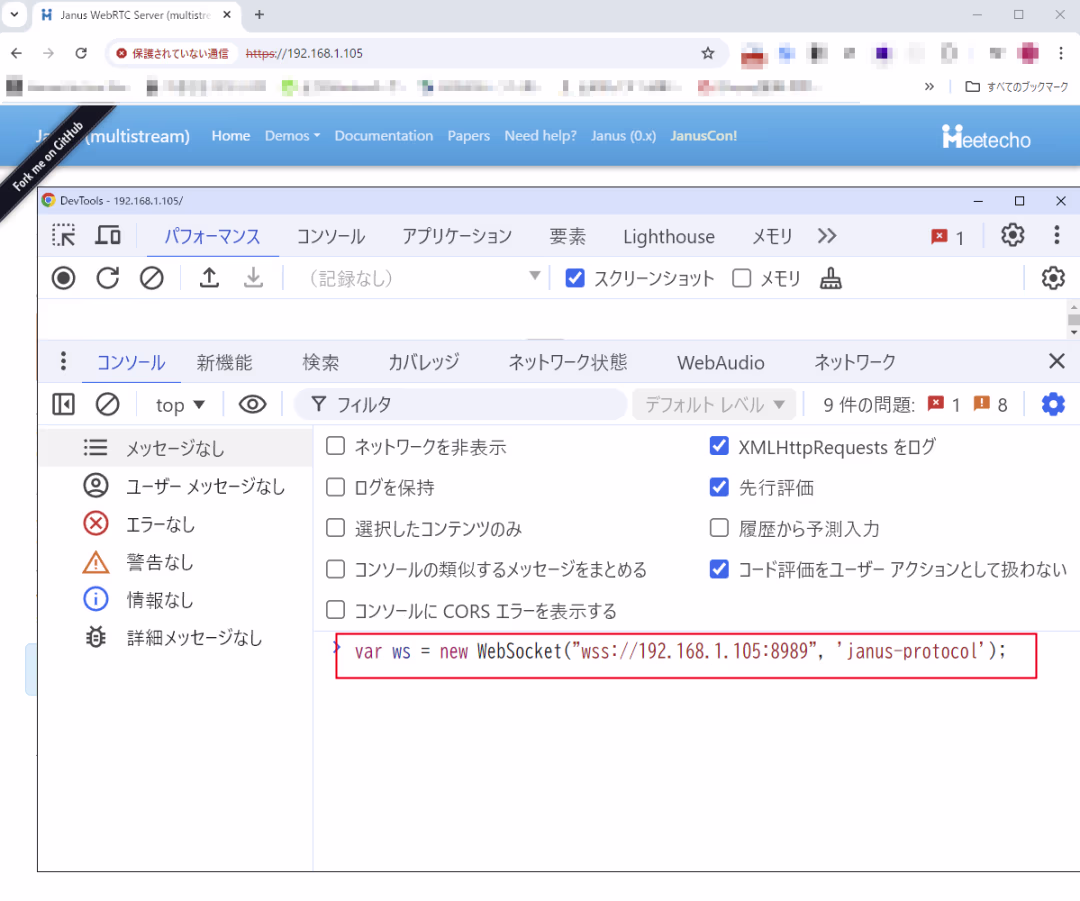

var ws = new WebSocket("wss://192.168.1.105:8989", 'janus-protocol');
ws.onmessage = (msg) => console.log(msg.data);
ws.send(JSON.stringify({janus:"create" , transaction:"abc"}));
websocket接続、ffmpegの配信・映像受信、ビデオルームの参加の確認ができました。
自前でzoomのような簡易会議室が使用でき、監視カメラのような使い方もできるようになりました。
色々とパッケージが必要になり、一部のパッケージはビルドが必要になるため少し、janusを使うハードルが高い気がします。
ossで使えるwebrtc sfuなのでありがたいのですが環境構築に時間がかかり、websocket通信のライブラリーサンプルが少ないので困る。使ったことはないが、mediasoupを使う方が良いのか?
あと、janusを前使った時は32bitのハードウェアで動かなかった気がする。


